

|
|
![]()
![]()
![]()
![]()
![]()
![]()
![]()
![]()
![]()
![]()
![]()
![]()

|
Have you ever come up with a good idea and thought of sharing it with others? You have? Well send it to us and we will add it to this page for all to see. Below
are ideas, tips and tricks that others have used and are ready to
pass on. Hope they help. Patricia Ely, Mineral Wells, Texas:- I'm fairly new at mosaics. I'm disabled and can't stand or bend over to clean up small shards of glass or tile that scatters when cutting with nippers or glass cutters. I found by using the plastic shopping bags we all get the markets, are great to do the cuts in. I first cut off the handles with scissors, as they just get in the way, then with the bag laying on my table I open the bag on its side and put both hands inside the bag while cutting. Now all the tiny pieces are contained in the bag to be tossed away. Look for large bags, but the regular bags for grocery's do well too. Rosalind Wates of Somerset, England, has come up with a new version of the reverse technique. The orthodox way is to draw the design in reverse on to a sheet of brown paper, and stick the tesserae face down with the water soluble glue. Rosalind suggests using transparent builder's polythene, drawing the design direct with a chinagraph pencil, and sticking the tesserae face down on the reverse side with Spray Mount®, (photograph mounting spray), which stays tacky for several days. As the polythene is transparent, you can keep checking the final effect. Elizabeth Simms of Newcastle, England, finds that Evostick 191 Adhesive Cleaner® is particularly good for cleaning up terracotta, after your'e finished sticking tesserae on your pot, or whatever. Jamie Jeffreys, London, England, has come up with an interesting variation of the "double reverse" technique. He sticks the tesserae face up , with Pritt Stick®, onto greaseproof paper. When the design is complete, he presses sticky-back transparent plastic onto the surface, turns the mosaic over, and removes the paper. He grouts the back in the normal way, fixes the mosaic in the setting bed, peels off the plastic and finishes off. George Fishman of Florida has kindly sent us two tips, (1) a tip for face mounting: In place of opaque "kraft" paper, try using a medium to heavy weight of tracing paper and wallpaper paste. When the paste dries clear, the tracing paper allows one to see the mosaic surface. This is especially useful where sections must be aligned. (2) His second tip is as follows,"I currently use a kind of lime putty for double reverse method. (1 pound hydrated horticultural lime: 3 pounds ground limestone, mixed w/water) Trowel about 3/8" thick onto a panel, and it provides a good temporary setting bed for layout of smalti. When layout is complete, apply the surface mount of paste and paper, then flip assembly when thoroughly dry. The lime putty can be peeled or crumbled away from the back of the mosaic (depending upon how dry it has become). I use a dilute acid cleaning for last stage to assure there is no residue to weaken the thinset adhesive bond."
Here is a useful tip from Jean Ann Whiteman of Dallas. "Sometimes the piece you cut and apply glue to simply won't fit the space you intended it for. I keep a jar filled with water next to my work station and pitch the glue covered tile in it. At the end of a work session I empty the contents into a sieve, outdoors, turn the garden hose on it and retrieve clean tiles for the next session." Susan Zucker from Boston MA. has sent us this in reply to a request on our Q&A page. "I have an inexpensive and easy to make version of a hardie. Buy a brick/mortar chisel with as wide a chisel head as you'd like. Get two pieces of scrap 2 x 4 inch lumber, one longer than the other. Drill a hole all the way through the smaller piece until it's wide enough to hold the handle of the chisel snugly (using a wood file helps). Glue and hammer the smaller piece onto the center of the longer piece (Don't drill a hole in the longer piece). I also bought a bricklayer's hammer, as it's back is non-forked. I've been using it for awhile and it works great!!!" Thanks to Lia Catalano, from Upstate New York, USA. for sending us this tip."I have found a hand-cutting mosaic tool which I use more frequently than my tile nippers, but don't see it mentioned in any of the how-do books, or even in this website. It is called a mosaic glass cutter, but it cuts ceramic and smalti just as easily as glass. It uses two cutting wheels, and makes really straight cuts with very little squeezing -- especially when you "cut" close to the edge. It does not do shaping like tile nippers, but I find that I can get straighter cuts with it than I can get with the nippers (therefore, less waste). I'm sure that it's available in many places, but I got mine from the Delphi Stained Glass Company (http://www.voyager.net/delphiglass). In their 1996-97 catalog, the price was $27.95. Another good thing about them is that when the cutting wheels dull, you simple rotate them around for lots more life. Hope that you find them as useful as I do." P. McNulty , Garrison, New York says "I use mosaic glass cutters, as does Lia Catalano (Ed. see above). I agree with her, the mosaic glass cutters are much better than tile nippers. I got my glass cutters from Hudson Stained Glass Company in Peekskill, New York. They were on sale and I got them for less than $20.00. I think they listed at about $20-$25. They really are terrific!" Here's a handy tip for grouting from Alan Middleton in Sydney, Australia. "After you have mixed your grout dry, Take about 1/4 of this dry mix out and stand it aside. Mix the rest of the grout as per manufactures instructions and apply as normal. When you have wiped the excess grout from the job using wet sponges, you will notice small pin holes (some larger) in the grout along with the usual smear left on top of the tiles. Wipe as much water as you can from the tiles then place the dry grout mix (called dryers) on top. Rub the dryers into the grout joints. There is enough water in the wet grout sitting in the joints the wet up the dryers mix as you apply it. You will find that as you rub the dryers into the joints, it will not only fill ALL the small holes that keep appearing if you wipe the job with wet sponges, but it will also clean the excess wet grout smears from the top of the tiles. Let job stand for about 5 minutes then wipe the tiles and grout joints with a DRY lint free cloth. This should be enough to fully clean the tiles with only a slight wipe over the next day for completion. I also recomend that on completion you paint the finished work with either a penertrating tile sealer or a satin gloss tile sealer. These products are not cheep but can be bought at most tile suppliers in 1 litre containers. 1 litre of sealer will cover quite a few jobs. Sealing the surface will protect the grout from staining or discolouring and it also gives a nice lustre to the finished job." Elly Verkooyen, Amsterdam, The Netherlands. "Every time I see a beautiful pattern I would love to mosaic I find it difficult to draw this picture on say a piece of wood. Now here is the solution: Make a copy of the picture, maybe even enlarge it, Put it face down on the floor, table etc you want to mosaic. Put some thinner on a cloth and Rub softly on the paper. If you pull the paper away you will find that the image is copied on the table, floor etc. I hope that this solution is of some help to some of you. I know it works for me! " When you are done working with cement or grout, after you clean your hands, rinse your hands with vinegar, it helps restore your pH balance. It will help keep, your hands from drying out so bad. Here is a handy cleaning tip sent in to us by Jessie Ong in San Antonio, Texas USA. "To clean off a freshly dried grouted mosaic, use vinegar, it is very mild and does a wonderful job of cleaning up. It is very inexpensive compared to some of the commercially available cleaners." Collect up your bits with this sticky tip from MaryAnn Jaggi, Corry, Pa. USA. " While working at my table I often would become exasperated with the grains of glass and itty-bitty shards....While at the store I noticed one of those LintPicUp Giant Rollers for pet hair or clothing...It works beautifully...the exposed adhesive picks up miniscule bits of those irritating pieces! Too simple a tip for some but it is a great addition to my list!!" Elaine Dinerman from Atlanta, Georgia,says "I like using a Dremel power tool to file rough or chipped edges. It's much faster than using a ceramic file. The metal brush bit is good for small bits of grout that dried too quickly. " Joshua Lowell from Northern California sent this useful tip to us. "I have just returned to making mosaics after a 20 year hiatus. I realized that I needed some type of paste to stick my tile face down as I cut them and that I had none. I had, however recently finished wall papering my kitchen with some "prepasted wallpaper". That is the type of wall paper that comes with the paste already on it. The paper must be dipped in water to wet the glue for it to stick. As I recall from , the first mosaic I made, I cut the pieces for a small section and laid them face up on a pattern and then covered them with cheese cloth or muslum which I had dipped in wheat paste which is the same thing that wall paper is stuck to walls with. It stood to reason that this new "pre-glued paper should work in much the same way... and it did! For small projects, I transfer my pattern, in reverse, to the back of a piece of wall paper. as I cut tile, I wet the paper or the face of the tile with a small brush and set the tile face down on the paper. I dries rapidly and firmly, but it takes a bit of practice to avoid using too much water and washing away the glue. After the cutting, I set the mosaic in mastic, leave it for an an hour or more to allow the tiles to set and then rewet the paper with a sponge to remove the paper in the normal manner." Thanks to Josie Celio for this idea.Have you ever used VCT tiles (vinyl composition tile) for mosaic? You know, the commercial solid vinyl made by Armstrong, Mannington, etc. that you see on grocery store floors. Don't laugh, they are wonderful! They are cheap, come in a variety of wonderful colors and are easy to cut and use for adults and children alike. I encourage you to give them a try. The results are fabulous and you can get a very natural stone look if you like, or a bright modern art look. You use them with regular tile adhesive and a nice fine grout. Jan
Pozzi of Mosaics by Jan Pozzi, Inc. of Galveston, Texas Frank Lazzaro has found a useful tool. We think this is more suitable for those in the USA as most DIY shops here in the UK do not give away free tin openers. "Found a great little tool today, well actually it was there all the time... the little hooked opener you are given free with a can of paint. It is great to get into the corners to remove grout you didn't want there! It will scrape along a line perfectly to remove the excess. "
|
 I
get the design or picture printed on the cloth (plotter if it is
large like a mural), fix it on a board with tape and start to glue
my tiles or grain pebbles (micro-mosaic). When finished I remove
the tape, lay another board on the mosaic and turn it upside down.
I put glue on the carrier and lay it on the mosaic, turn it upside
down and control if correction is needed. After drying grouting
is possible. I myself don’t use grout but instead I use a
filler as I don’t have many joints. In my opinion grouting
influences the color too much. If a mosaic pallet is needed you
can use fibreglass net cloth which is available in different sizes
of hole widths. The mosaic in the photo I made with a net with holes
of 1 cm."
I
get the design or picture printed on the cloth (plotter if it is
large like a mural), fix it on a board with tape and start to glue
my tiles or grain pebbles (micro-mosaic). When finished I remove
the tape, lay another board on the mosaic and turn it upside down.
I put glue on the carrier and lay it on the mosaic, turn it upside
down and control if correction is needed. After drying grouting
is possible. I myself don’t use grout but instead I use a
filler as I don’t have many joints. In my opinion grouting
influences the color too much. If a mosaic pallet is needed you
can use fibreglass net cloth which is available in different sizes
of hole widths. The mosaic in the photo I made with a net with holes
of 1 cm."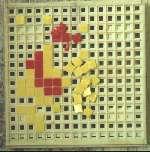 The
picture to the right shows a mosaic pallet, a device for speeding
up opus regulatum with vitreous tesserae. You place tesserae of
the desired colour in the spaces, cutting and fitting smaller shapes
if neccessary. When the pallet is full, you use water-soluble glue
to stick brown paper over the top, and lift the square of complete
mosaic from the pallet. You place the mosaic in the setting bed
in the normal way. Sadly the pallets are no longer available in
the UK, but it should be possible to make your own. A mosaic pallet
for 20mm x 20mm glass mosaic can be obtained from J W Green Swimming
Pools Ltd in Wolverhampton, England. Tel:00 44 1902 42 77 09
The
picture to the right shows a mosaic pallet, a device for speeding
up opus regulatum with vitreous tesserae. You place tesserae of
the desired colour in the spaces, cutting and fitting smaller shapes
if neccessary. When the pallet is full, you use water-soluble glue
to stick brown paper over the top, and lift the square of complete
mosaic from the pallet. You place the mosaic in the setting bed
in the normal way. Sadly the pallets are no longer available in
the UK, but it should be possible to make your own. A mosaic pallet
for 20mm x 20mm glass mosaic can be obtained from J W Green Swimming
Pools Ltd in Wolverhampton, England. Tel:00 44 1902 42 77 09
All
content is copyright of © Mosaic Matters and its contributors.
All rights reserved
Mosaic
Matters is:
Editor: Paul Bentley
Web Manager/Designer: Andy Mitchell